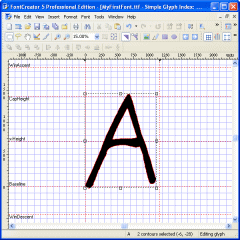
Now go back to FontCreator (use ALT-TAB to switch between programs) and paste the image into the Glyph
Edit window (CTRL-V). Usually the import algorithm takes just a few seconds, however complex images do take longer.
The top of the outline should be near 1400 units and the bottom should
be on the baseline (the red horizontal line). The left side should be
close by the red vertical line. If necessary, adjust the size and
placement of the contours, by selecting all contours (CTRL-A) and using
the mouse or the arrow keys. When resizing, hold down the SHIFT key as
you drag the corner handle to guarantee that it's resized
proportionally. You can also use the Transformation toolbar to change
the position and size of the contours.
The left and right side bearings (explained in the Glossary) can be changed by dragging the
vertical dashed lines to their desired position. The glyph should be
positioned between these lines, otherwise characters will overlap each
other. In other words the left side bearing should be near the red
vertical line and the right side bearing should be placed right after
the outlines.
It is also possible to further improve the outline in the Glyph Edit window, adjusting points
etc., but that is beyond the scope of this tutorial.
Close the Glyph Edit window
(CTRL-F4) and save the font file. Select Save As in the File menu and choose the name and
destination (for example C:\MyFonts\MyFirstFont.ttf). Do save the font
every once in a while to prevent loss of work due to external factors
like a power failure.
[back to step 4] [continue with step 6]

Step 5 - Import Outlines for Capital Letter A

